
The Cue Sheet: The Essentials of a Concert
Today I’m bringing you the continuation of my previous post: What’s it like to be a lighting designer for a concert? If you haven’t read it yet, you can head over to this link and start following the step-by-step of what live show lighting is all about. This time I’ll focus on one of the most essential parts of the concert: The Cue Sheet.
We already went through the meeting with the artist and creative team, how important it is to share our point of view and ideas based on the artist’s vision, and the need to request the LIGHTING PLOT from the venue (I’m writing it in caps again because it really is the most important part of all).
Now it’s time for the scouting: visiting the venue where the show will take place.
Step 3: Scouting
Once you’ve had the meeting, know the setlist, and have a clear idea of how you want the lighting design to look, it’s time to visit the venue and check your Lighting Plot in real life.
I should clarify that I had requested the plot way earlier, but in most cases, you’ll receive it at this stage.
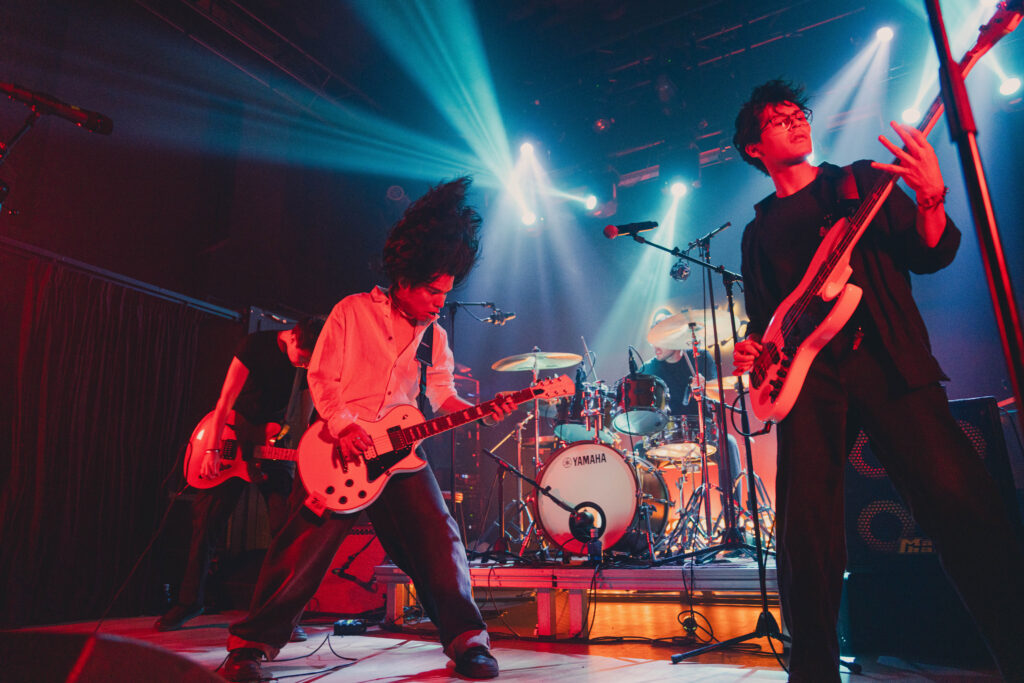
In my case, the show was at Sala Villanos in Madrid. When I arrived, I took photos of the stage, noted the position of the lights, and filmed a short video to capture the size of the space. This helps me keep in mind what the artist will see and what the audience will see.

Besides pictures, it’s key to clear up all doubts. That’s why I always recommend bringing a list of prepared questions before scouting, so you don’t forget them in the excitement of the visit.
It’s also important to check the control console to ensure you understand how the lighting programmer will function when loading everything and to confirm it aligns with your plan.
Once that’s settled, it’s time for the creative part.
Step 4: Storyboard and the Cue Sheet
Here’s where the fun begins. This is the stage where you imagine how each song will look on stage, giving it a unique feel that helps the singer stand out.
If you’re new to this, I recommend this blog that helped me understand each type of light and its purpose:
– https://illuminated-integration.com/blog/stage-lighting-101/
It’s the most complete guide I’ve found on terminology, fixtures, and positions, essential knowledge before building a Cue Sheet.
If you prefer something more visual, check out these guides:
– https://www.bbc.co.uk/bitesize/guides/z39x34j/revision/4
– https://blog.etcconnect.com/stage-lighting-design-part-4
With that knowledge, you can now create a Cue Sheet. It’s basically a description of the moments when lighting changes happen, specifying light type, position, and duration. (You don’t need to be too specific with timings; it’s enough to capture the moment or the feeling within the song.)
Since I come from a film background, I like to visually represent the staging through a storyboard before doing the Cue Sheet. It’s not common practice, but for me it helps clarify what I want, and when I hand it over to the lighting programmer, my intentions are much clearer.
Here’s an example of one of the storyboards I made. It was for the opening track. At first I wasn’t sure if it worked, but in the end I realized it got the message across.
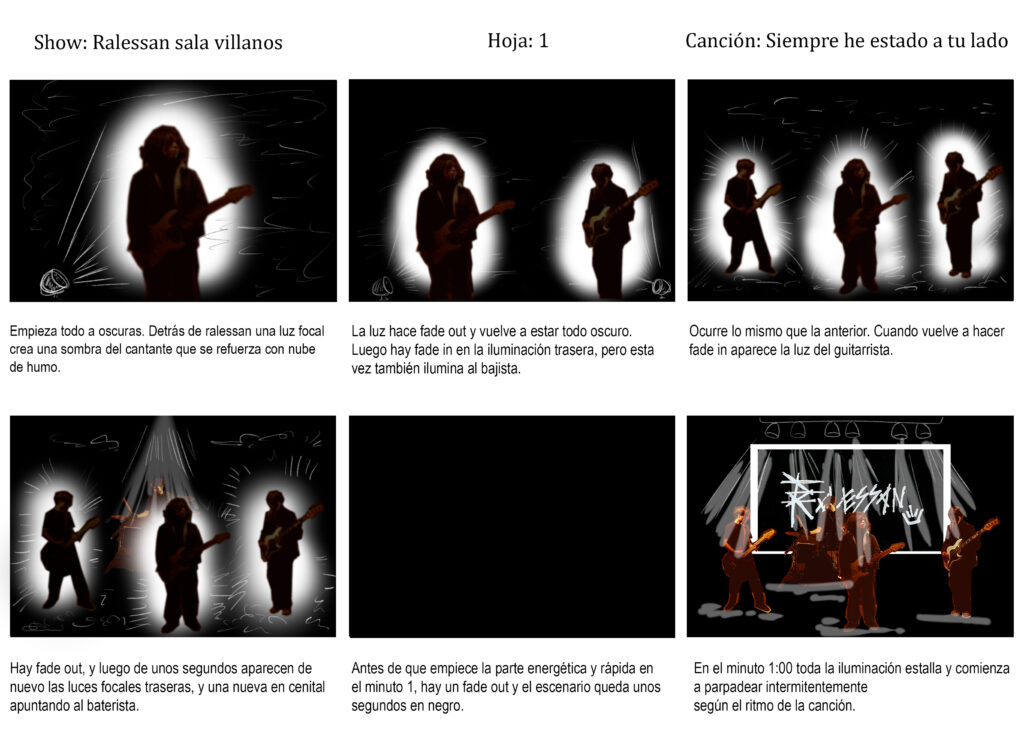
At the beginning, I was too strict with timings, but later I learned that it was a mistake. In live shows, nothing ever happens exactly like in the studio recording.
Once the storyboard is complete, I proceed to the Cue Sheet. Here’s the one I put together for this festival:
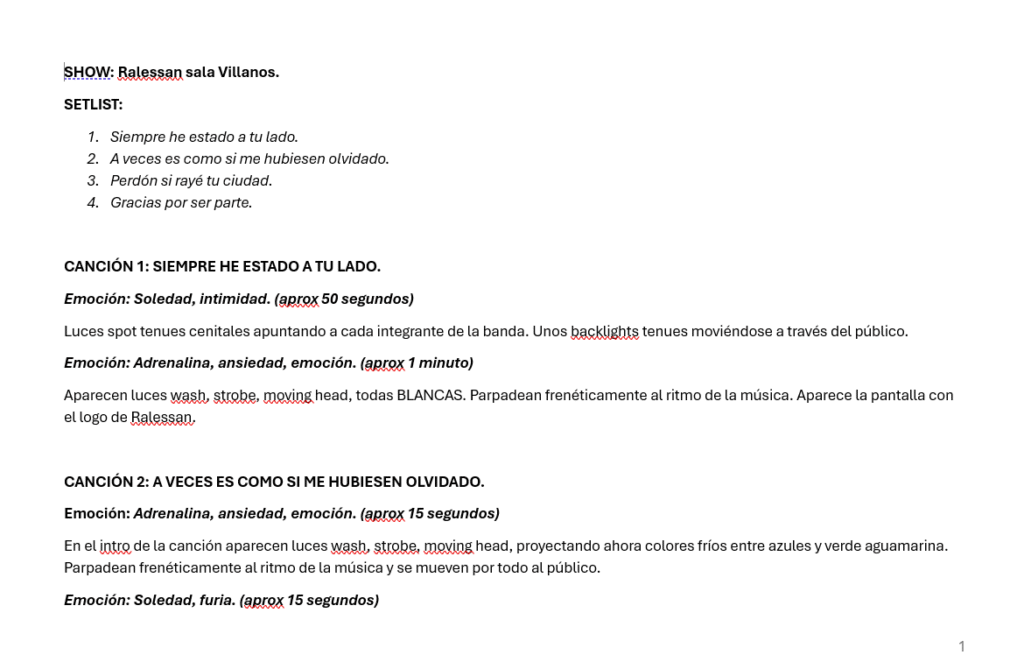
As you can see, it’s very simple. For better organization, I recommend using Excel (you can also find templates online). In my case, I didn’t need too much detail because the storyboard already made things clear.
With that ready, we move on to the next step.
Step 5: Lighting Programmer
Once you’ve got the document, it’s time to meet with the lighting programmer to explain what you want. They’ll ask the necessary questions, and together you’ll define the main cues for the songs. Thanks to the storyboard, they can even pre-program some parameters on the console, like a spotlight on the lead singer or variations for the rest of the band.
At this stage, their work is basically a sketch based on your storyboard, but during soundcheck, everything can be adjusted.
Step 6: Soundcheck & Light Rehearsal
Almost showtime! Here’s a practical tip: if you’re working with a band or vocal group, get stickers with their names or vests with clear labels. It helps both the lighting programmer and sound engineers quickly identify each member without having to ask.
In my case, during rehearsal, the programmer already had several cues set up; we just had to adjust the lights to match the performers’ exact positions on stage. Once they started playing, we did the lighting test. Usually, though, this happens during the final rehearsal, since the first ones stop often for sound adjustments.
In the last rehearsal, we go through every song, check that the lights follow the performance, and polish any details. Here’s a video from that moment:
I always recommend having a Plan B with general cues. For example: during a chorus, use moving lights; during verses, use front light or a top spotlight. That way, if there’s a programming issue, you’ll at least have basic resources to fall back on.
Step 7: The Big Day
After all the hard work and emotional ups and downs, the big day finally arrives. Before the show, everything is checked one last time, and then all that’s left is to wait for the start.
During the concert, we stay next to the lighting programmer, alert to any questions or specific moments where a cue needs to be reminded. It’s a team effort, staying focused on what’s happening on stage, in contact with the sound engineers and the rest of the crew to solve any unexpected issues.
At the end, when it’s all over, you can feel satisfied if the job was well executed. Then it’s just a matter of waiting for photos and videos to see how the audience experienced it. Afterward, we hold a final meeting with the team to evaluate how everything went and what can be improved.
And that’s the end of this two-part blog. I hope you enjoyed it and, most of all, that it’s useful when you find yourself working in this field. And if you’re already a pro, let me know what else you include in a more advanced lighting design. As I mentioned at the start, this was just my experience with a small indie project. See you next time!